RUBY 10 and RUBY 10 Speech Advanced Features and Functions - ENU
Original Creation Date: Monday, May 13, 2024
Last Modified: Tuesday, May 14, 2024
Download PDF
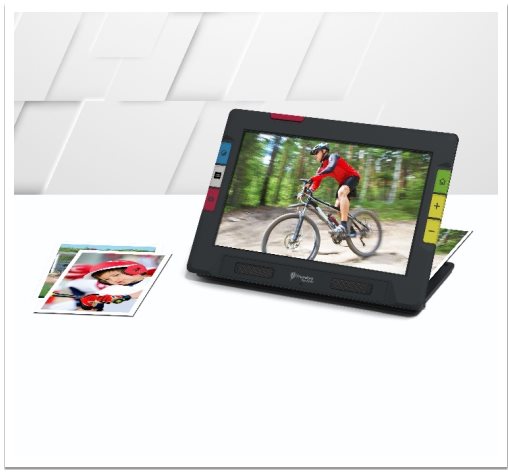
RUBY® 10
RUBY® 10 Speech
Advanced Features and Functions

© 2023 Freedom Scientific, Inc. All Rights Reserved. RUBY® is a registered trademark of Freedom Scientific, Inc. in the United States and other countries. Information in this document is subject to change without notice. No part of this publication may be reproduced or transmitted in any form or any means electronic or mechanical, for any purpose, without the express written permission of Freedom Scientific.
Your Purchase
Depending on your needs, you have either received a RUBY 10 or RUBY 10 Speech. RUBY 10 Speech includes optical character recognition (OCR) and speech functionality—not RUBY 10. If you have RUBY 10, please disregard sections of this user's guide that describe the speech or scanning controls.
Warranty
Congratulations on your purchase of the RUBY 10 or RUBY 10 Speech Video Magnifier. To register your product and validate your warranty, visit the Freedom Scientific website.
Caution: These devices have no user-serviceable components. Any unauthorized attempt to service or replace internal components by opening the case will void the product warranty.
Technical Support
You can search our knowledgebase for immediate answers to your product questions. Freedom Scientific also offers free technical support to its U.S. customers using any of the following methods:
International customers are supported by their local dealer or distributor. Use our dealer locator to find the dealer serving your area.
If you need to return your unit, the technical support specialist will issue a Return Materials Authorization (RMA) number that must be referenced on the outside of the package containing your returned unit. Your unit or its accessory will then be exchanged or repaired as needed.
Table of Contents
Getting Started
Charge RUBY 10
First Use
Power Down and Standby
RUBY 10 Overview
How to Use This Guide
What's in the Box?
RUBY 10 versus RUBY 10 Speech
Help Text
Snapshots and Captures
Views
Physical Buttons
On-screen Buttons
Display Options
Touch Screen
Tactile Response
Menus
Default Mode and Advanced Mode
Default Mode
Default Live View On-screen Buttons
Advanced Mode
Advanced Mode Main Menu
Advanced Mode Live View On-screen Buttons
Cameras
Magnification Camera
Overview Camera
Full-page Camera
Reading
Writing or Hobbies
Live View
Magnifying an Image
Color Modes
Tap to Focus
Focus Lock
Taking a Snapshot
Camera Light
Line or Mask
Color, Contrast, and Clarity
Color Combinations
Text Color Combinations
Image Color Combinations
Adding Color Combinations
Visual Display Settings
Light Sensitivity Filter
Color Blindness Filter
Visual Properties
Brightness
Edge Effects
Reset Settings
Saving and Scanning Files
Capturing a Page
Capturing Multiple Pages
Navigating Using the Touch Screen
Navigating Using Page Numbers
Changing the Page Order
Saving a File
Recording Audio Tags
Reading Language and Voice
Viewing Modes
Text Mode button
Viewing Modes Screen
Managing Files
Opening and Editing a File
Image Files
Document Files
File Names
Storing Files
Deleting Files
Connecting RUBY 10 to Other Devices
Audio Jack Connections
USB-C Cable Connections
Miracast Wireless Connection
Connecting to a Miracast-enabled Display
Status of Miracast Connection
Bluetooth Wireless Connection
Using Bluetooth to Connect
Re-enable Bluetooth
Status of Bluetooth Connection
Updating RUBY 10
Requirements
Update RUBY 10 Using a USB-C Drive
Update Using a USB Cable
Menus
File Manager
Settings Menu
Appearance Menu
Language Menu
System Settings
Mode
Information
Miracast
Bluetooth
Visual Properties
Sound Settings
RUBY 10 Advanced Features and Functions 1
To get started, follow the instructions in this section for charging the device and using it for the first time.
Fully charge RUBY 10 before using it for the first time. It takes about three hours to fully charge the device. Anytime the charging LED light on the left side of the device is red, the battery needs to be charged. You can work when the LED is solid red, which means that the battery is charging. However, it is best to leave it plugged in until the light turns green.
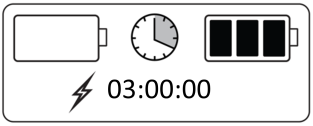
The light turns green when the battery is fully charged. With a fully charged battery, you can use the device for about three hours without it being plugged in. It is best to charge it whenever possible.
To charge RUBY 10:
- Insert the USB Type C cable into the USB-C slot on the left side of the device.
- Attach the power adapter to the USB-C cable and plug the power adapter into an electrical outlet. You can alternately insert the cable into a computer without using the adapter, but this charging method is slower.
- Find the orange Power button on the bottom of the left side of the device. Press and hold the Power button for 3 seconds to power on RUBY 10.
- See the next section, First Use.
The first time you use RUBY 10, you must select the menu language and voice, font size, and time and date. You cannot use the device until you set these options. However, you can change the settings later if needed using the instructions in this document. You only need to set these options again if you reset the device to factory settings.
Tip: If you are uncertain about a button or icon, you can display help text by pressing on the control for about 3 seconds until you see help text displayed on the screen.
Before you begin using RUBY 10:
- Charge RUBY 10 and power on the device. See the previous section.
- The first time you power on your RUBY 10, the Select Menu Language screen is displayed. Swipe up or down until the language to be used for displaying the user interface (e.g., screens and help text) is selected in the center of the screen.
- Tap the Next button in the lower right corner to go to the next screen.

- On the Font Size screen, scroll to select the size of text you want used to display the user interface. Tap the Next button. If you want to return to the previous screen, tap the Back arrow in the lower left corner.
- RUBY 10 Speech only: On the Select Menu Voice screen, select the voice you want used to narrate the user interface, such as the menu names and the help text. Tap the Next button.
Note: You can change the voice or language at any time by going to Main Menu > Settings Menu > Language Menu > Select Menu Language.
- On the Select Date screen, scroll through each column to select the month, day, and year. Tap the Next button.
- On the Select Time screen, scroll through each column to select the hour, minutes, and AM or PM. Tap the Next button. Setup is complete and Live view displays.
Note: If the time changes (e.g., daylight savings time), you can modify the time by going to Main Menu > Settings Menu > System Settings > Time & Date. You can also change to a 24-hour clock by sliding the scroll bar to the right.
To put the device on standby, briefly press the orange Power button. Press and hold it for 7 seconds to power down.
We recommend that you first familiarize yourself with the information in this overview so you can easily recognize the names of the buttons, icons, and menus. You may find it useful to print all or parts of this document, which is formatted for double-sided printing (odd pages on front and even pages on back).
The instructions are organized by task. Review the table of contents and perform searches within this file to find the information you need.
RUBY 10 has no speech or text recognition, while RUBY 10 Speech has both. If you have a RUBY 10, then descriptions of speech features and text recognition in this document do not apply to you.
The RUBY 10 packaging contains:
- The RUBY 10 video magnifier or the RUBY 10 Speech video magnifier
- A protective pouch
- A USB power supply with USB-C cable
- Four country-specific power plugs (EU, US, UK, and AU)
- A screen cleaning cloth
- Safety and Care document
- Setup and Use document
If any of these items are missing from your package, contact your distributor or Freedom Scientific.
If you received a RUBY 10 model rather than a RUBY 10 Speech model, then speech functionality is unavailable in your device. Menus and controls for voice and speech are not found on your RUBY 10 screen. You should ignore all mention of voices, speech, and reading aloud in this manual. You also do not have the text recognition feature (also called optical character recognition or OCR) so you cannot scan an image and convert it to text.
If you have RUBY 10 Speech and because of your locale, you select a language without an available voice, or a voice has not been installed, the feature to define the menu voice is hidden. However, you can select another language to use for the reading voice, which is separate from the menu voice.
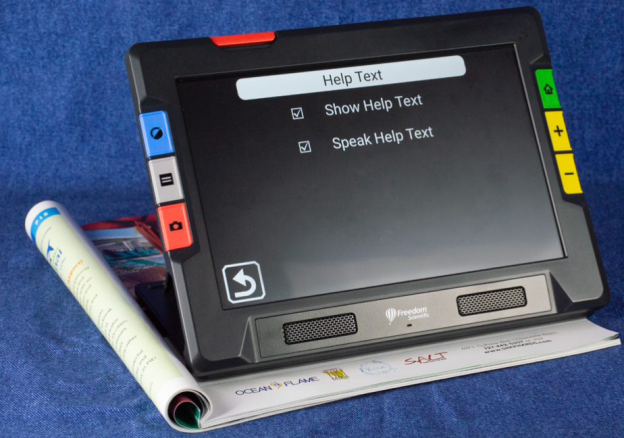
Help text assists you in learning to use RUBY 10 and make the most of its features. When you press a button or on-screen control for 3 seconds, help text is displayed and/or spoken, describing what you are about to do. For example, pressing the blue Color Mode button for 3 seconds results in information about this button scrolling across the top of the screen.
You can close the help by tapping the Cancel button to the right of the text box.

RUBY 10 Speech only: If you want to have the help text spoken, follow these steps. The same steps are taken if you no longer want to display or hear help text.
- In Advanced mode, tap the Main Menu button.
- Once in the Main Menu, go to Settings Menu > Language Menu > Help Text.
> >
- On the Help Text screen, tap one or both checkboxes to display and/or listen to helpful information about the current control, such as a screen or button. To display or hear the help text, press and hold a user interface component for about 3 seconds. The same help information is displayed and spoken. For more information on sound settings, see page 79.
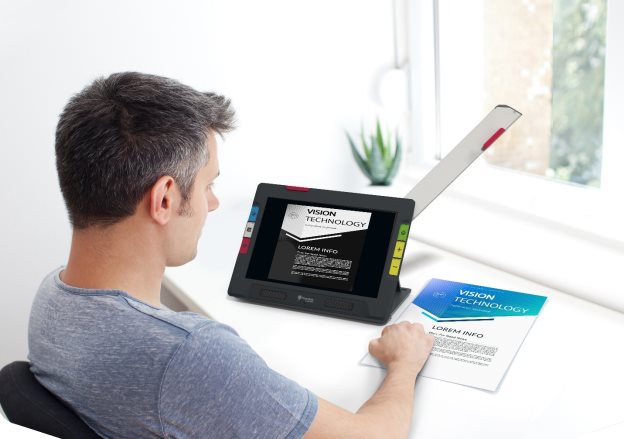
Live video and capture are available using three cameras, each with its own purpose. Live video allows you to get a magnified or augmented view of an object and prepare the camera to take a clear snapshot. Capturing allows you to save a snapshot and open it later. A short press of the red Capture button freezes the image on the screen as a snapshot.
RUBY 10 Speech only: Text recognition and readback are also available when capturing a snapshot. With a long press of the Capture button, you can save a page, recognize the text on it, and have it read to you.
RUBY 10 works differently depending on which view you are using. In Live view, you can achieve both a magnified and improved view of the environment and prepare the camera to take a clear snapshot. Go to Live view at any time by pressing the green Live View button.
A short press of the red Capture button freezes the image on the screen as a snapshot.
You can drag a snapshot to see parts of the image that are outside the screen's boundaries. If you take a snapshot of a shirt, for example, you can zoom in to magnify the label, then drag the image up or down to view the stitching or other clothing details. You can pan the image in any direction until the end of the snapshot.
RUBY 10 Speech only
A long press of the Capture button saves a page, recognizes the text on it, and has it read to you
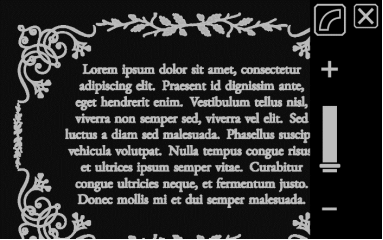
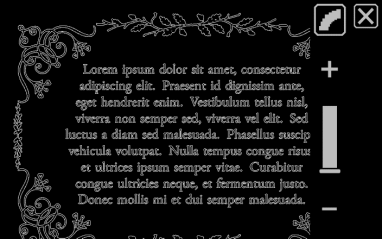
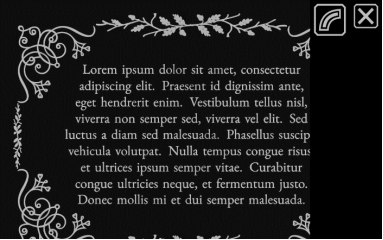
When viewing text that has been captured and scanned, or when viewing an imported document file (RTF, PDF, or DocX), you are in Document view. Document view includes Image, Teleprompter, and Tickertape mode. Examples follow.
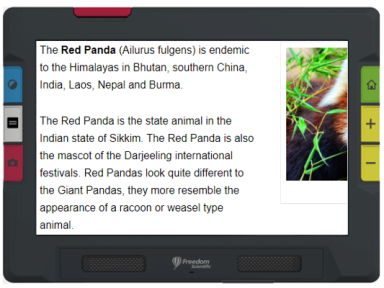
Example of Image mode
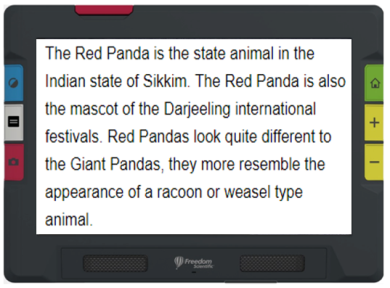
Example of Teleprompter mode
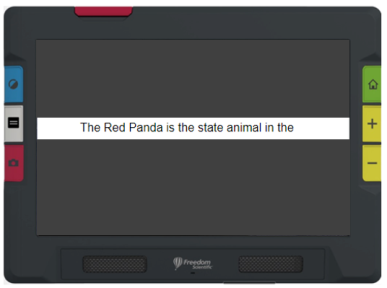
Example of Tickertape mode
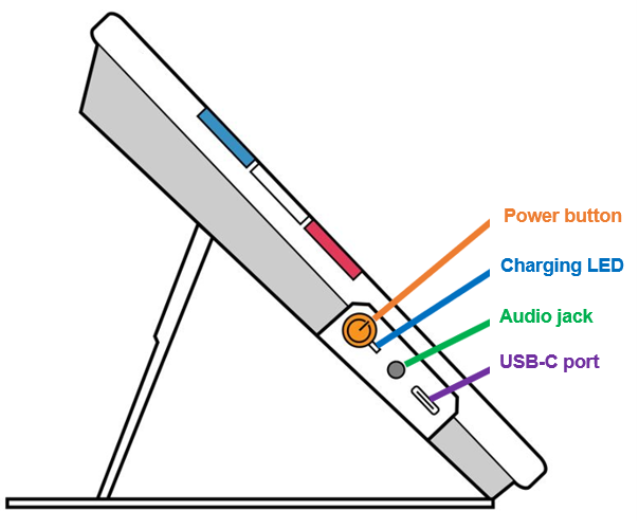
The following illustration shows the hardware buttons. The table below the graphic describes each button. In the descriptions, a long press means pressing the button about 1 second before releasing it. A short press means pressing and immediately releasing the button. If you enable touch vibration, a short press results in one buzz while a long press results in two buzzes. For more on touch vibration, go to Sound Settings on page 79.
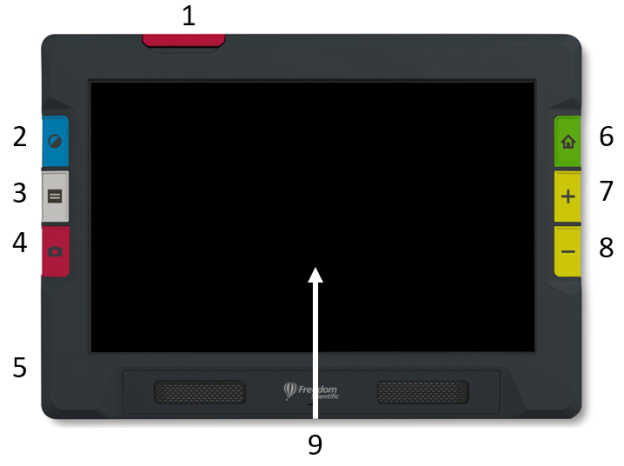
# | Button | Name | Color | Location | Description | |
1 | N/A | Camera arm | Red | Top edge on left | Push up to raise camera arm. Fully extend to use full-page camera. |
2 |
| Color Mode | Blue | Top left | Short press rotates through configured color combinations used in the display. Long press and release results in full color in Live view images (not in menus, snapshots or documents). | |
3 | 
| Text Mode | Gray | Middle left | Toggle lines and masks in Live view. Toggle between teleprompter, tickertape, image, and zone modes in document view. | |
4 | 
| Capture | Red | Bottom left | Short press captures the current image on the screen. Long press both captures and recognizes the text in the capture. | |
5 | 
| Power | Orange | Left side of device | Powers on/off the device. Short press to put on standby or wake up. Press 3 seconds to power on. Press 7 seconds to power off. |
6 | 
| Live View | Green | Top right | Activates the camera so that whatever the camera is pointed at is displayed on the screen. |
7, 8 | 
| Zoom In/Out | Yellow | Middle and bottom right | Press and hold for continuous magnification, press and release to incrementally magnify, or pinch to zoom on touch screen to increase or decrease magnification. |
9 | N/A | Touch screen | N/A | Middle of front | Pinch to zoom on touch screen to increase or decrease magnification. | |
| | | | | | | | |
Touch the screen to display the on-screen buttons. These buttons take you to menus and screens where you can configure the device to best meet your needs.
The buttons displayed depend on your view. Buttons are described in applicable sections. For example, the buttons displayed when you open a file are described in the Managing Files section on page 55.
The available buttons also are dependent on whether you are in Default mode or Advanced mode. More capabilities are offered in Advanced mode. See Default Mode and Advanced Mode on page 15 to learn how to use these modes.
You can display video in full color, high contrast colors, or grayscale. The following features are available for enhancing images:
- Color blindness correction optimizes colors for best viewing by individuals who are color blind
- Contrast normalization balances color and grayscale image viewing
- Dynamic contrast to make text more visible from the background
- Brightness sensitivity adjusts color for individuals sensitive to a high level of brightness
- Edge smoothing, edge highlighting, and edge only modes to provide options for enhancing
See Color, Contrast, and Clarity on page 32 to learn how to use these settings to display the image best suited to your eyesight.
The touch screen gives you a simple way to perform functions in RUBY 10 by directly interacting with the LCD screen.
- Tap on the screen to focus the camera and to display the on-screen buttons.
- Tap buttons and icons to navigate through menus and dialog boxes and to perform functions.
- Select options by scrolling through lists until the option you want is centered in the screen where it is emphasized.
- Pinch to zoom on touch screen to increase or decrease magnification: Place two fingers together on the screen, then spread them out to increase magnification and see more detail in part of the image. Place two fingers apart and pull them together to decrease magnification and see more of the image.


For immediate feedback confirming your actions, RUBY 10 vibrates briefly when you press a physical button or tap a software control (e.g., a checkbox, radio button, toggle switch, icon, or on-screen button).
This feature is on by default. To enable or disable tactile response:
- Go to Main Menu > Sound Settings.
- Tap the Touch Vibration toggle at the bottom of the screen. When you disable tactile response, a slash is added across the toggle button.

Menus are displayed by tapping the Main Menu button in Advanced mode.
To move through previous menus, you can tap the Back button.

Press the green Live View button to leave the menus entirely.
Your device is set to Default mode when you first use it. Default mode presents a limited, easy-to-use user interface that provides core features. Once you become familiar with RUBY 10, you may wish to try out Advanced mode, which offers more functionality.
To change to Advanced mode, tap the Advanced Mode icon.
Note: If your device does not have the Advanced Mode icon and you want to use this mode, contact your point of purchase.
The available buttons depend not only whether you are in Default mode or Advanced mode, but also which camera you are using. The following sections define the buttons that display in Live view for each mode when you are using the overview, full-page, or magnification camera.
In Default mode, you can take a snapshot, change the color combination and magnification used to display images, and use lines and masks. With RUBY 10 Speech, you can also read or listen to recognized text.
Buttons display when you tap the screen, and those buttons provide additional features. The buttons are hidden after 10 seconds, but you can tap the screen to display them again.
The buttons displayed depend on the camera you are using. When using the overview camera, these buttons are displayed: Brightness, Light On/Off, Focus Lock On/Off, and Advanced Mode.
When using the full‑page camera, these buttons are displayed: Brightness, Light On/Off, Focus Lock On/Off, and Advanced Mode.
When using the magnification camera,the Brightness and Advanced Mode buttons are displayed.
Brightness | Display a slider that controls the brightness of the screen. Move it down for dimmer or up for brighter. |
 
Light | Toggle the light on or off as needed to use the device more efficiently. |
 
Focus Lock | Toggle between locking the focus at its current position or unlocking it. Button on screen reflects the current state. |
Mode | Change from Default mode to Advanced mode. |
Advanced mode makes the full functionality of RUBY 10 available to you. Many tools enable you to create vibrant images and documents that are enhanced to be perfect for your unique vision.
Everyone is different, so RUBY 10 gives you the ability to change not only the colors of an image, but also the shadows and edges, the contrast, and the brightness. These tools are available through the hardware and on-screen buttons, as well as through the Main Menu.
To display in Advanced mode, tap the Mode button, then tap Yes on the confirmation screen.

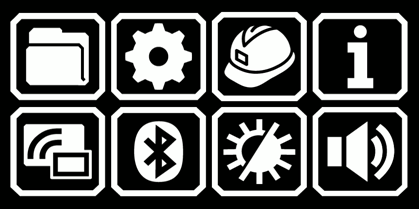
Tap any of the eight icons on the Main Menu to perform these functions:
File Manager | Manage document and image files. |
Settings | Display links to other menus that enable you to change the default appearance of images and documents, define reading and menu language and voice, and update system settings. |

Mode | Go from Advanced mode to Default mode, which is simpler to use but has less functionality. In Default mode, you cannot save files, recognize text, create multi-page documents, or connect via Miracast. |
Information | Display information about this device, such as the software version, product serial number, and other data you may need if you require technical support. |
Miracast | Connect RUBY 10 to another device using a Miracast wireless connection. |
Bluetooth | Connect RUBY 10 to another device using a Bluetooth wireless connection. |

Visual Properties | Change the visual properties to improve how the image is displayed on the screen. |
Sound Settings | Adjust the sound settings to increase or decrease the volume. RUBY 10 Speech only: Adjust both the volume and the rate of speech. |
Buttons display when you tap the screen, and those buttons provide additional features. The buttons are hidden after 10 seconds, but you can tap the screen to display them again.
The buttons displayed depend on the camera you are using. When using the overview camera (neither the stand nor the camera arm are extended), these buttons are displayed: Main Menu, Light, Brightness, Edge Effects, and Focus Lock.
When using the full-page camera (both the stand and the camera arm are extended), these buttons are displayed: Main Menu, Light, Brightness, Positioning, Edge Effects, and Focus Lock.

Main Menu | Display main menu. |
Light | Toggle the light on or off as needed to better view images. |
Brightness | Increase or decrease brightness level of the RUBY 10 display in real time by moving the slider left for darker or right for brighter. |

Focusing | Press and hold to zoom out and display crosshairs on the screen to help you reposition the object under the camera. Release to return to the previous magnification level. You can also use it to hone on a distant object. |
 
Edge Effects | Smooth and highlight edges. When disabled, a diagonal line is displayed across the button. See Edge Effects on page 39 for options, which vary by color mode. |
Focus Lock | Toggle between locking the focus at its current position or unlocking it. Button reflects the next state. |
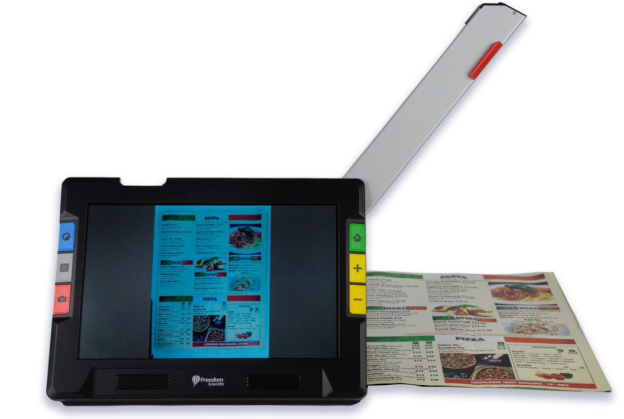
Cameras enable you to view objects in Live view, take snapshots, enhance images, and save them. RUBY 10 has three cameras, each serving a specific task or situation. Only one camera is active at a time, and its associated light is only enabled if it is active.
The availability of the cameras depends on the position of the integrated reading stand and the swing-out camera arm. All cameras are used both in and out of Advanced mode.
Three cameras and the camera arm enable you to use RUBY 10 in different ways, as described in the following table.
Camera | Location | RUBY 10 Position | Purpose |
Magnification camera, min 2x to 24x | Center of the body facing downward. Blocked if the stand is closed. | Stand is open and the camera arm is closed. | Reading on a desk or table. Put document beneath RUBY 10. |
Overview camera, min 1.8x to 22x | Center of the body. Partially blocked if the stand is open. | Both the stand and the camera arm are closed. | Spotting objects while holding the device, such as while shopping. |
Full-page camera, min 0.4x to 13x | At the end of the arm | Stand is open and the camera arm is fully extended. | Read and capture full-page document images, write your signature, or view other objects like photos. Good for hobbies. |
From minimum zoom to maximum zoom takes 5 seconds for each camera. You can display an image in full color, high contrast, or grayscale.
The magnification camera is used for reading on a desk or table. You must place the device on top of reading material, so leave the camera arm closed and extend the stand. The light is always on in this mode due to the darkness beneath the device.
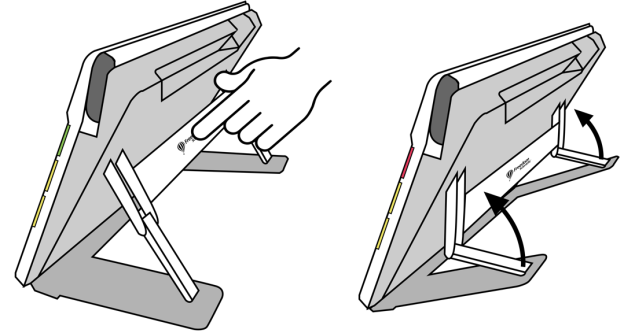
- Extend the stand.
- Hold the device upright with the bottom edge stabilized against a desk.
- Curl your fingers around the unit and push out the stand until it is fully extended and clicks into place.
- Gently set the unit down on the stand.
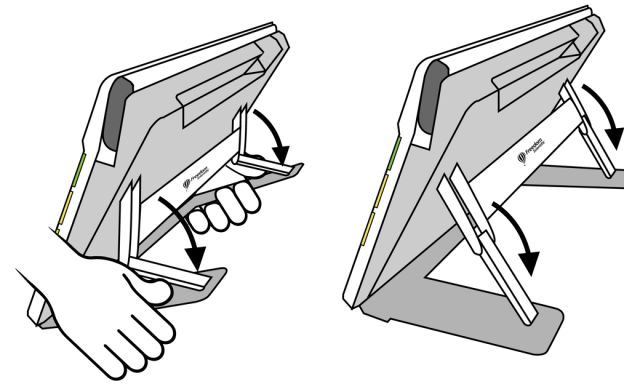
- Put the material you want to view beneath RUBY 10 until it is centered on the screen.
- Optionally, enhance the image using the yellow Zoom In/Out buttons or blue Color Mode button.
- Optionally, press the red Capture button to take a snapshot. Press the green Live View button to return to the Live view.
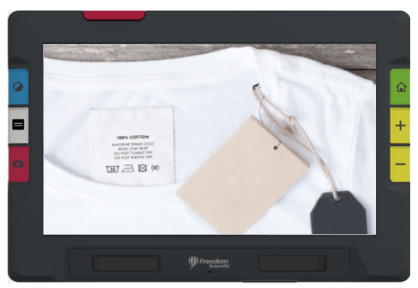
The overview camera is ideal for spotting labels, price tags, receipts, business cards, and more while carrying the device. You can use it to view objects several feet away.
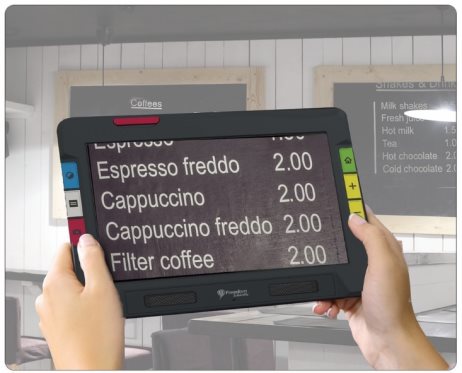
To use the overview camera:
- Close the reading stand by pressing the Freedom Scientific logo on the bar found on the back of the device.
. 
- Close the camera arm until it flush against the top of the device.
- Point the camera at what you want to view.
- Optionally, enhance the image using the yellow Zoom In/Out buttons or blue Color Mode button.
- Optionally, tap the screen to display buttons at the bottom of the screen. Using these buttons, you can display the Main Menu, turn on/off the light, or enable/disable focus lock.
- Optionally, press the red Capture button to take a snapshot. Press the green Live View button to return to the Live view.
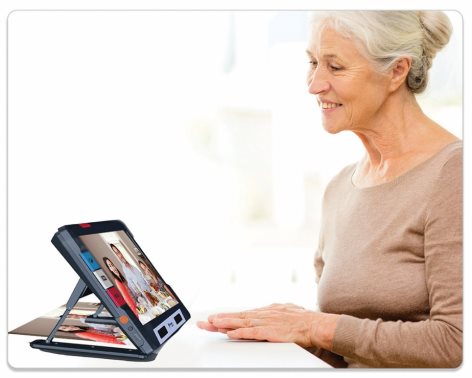
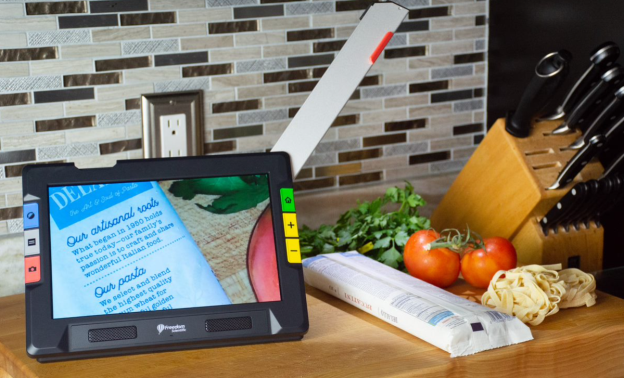
When the swing-out camera arm is opened and the stand is extended, the camera on it can be used to read and scan printed materials or write your signature without being restricted in your movements. You could also use this camera to work on hobbies, such painting.
To use the full-page camera:
- Open the stand.
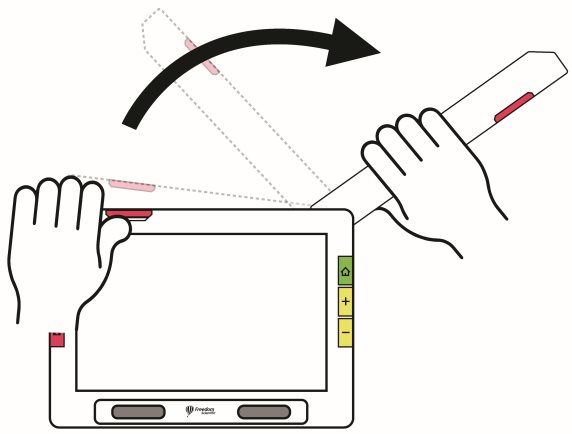
- Fully extend the camera arm.
- Push up on the red tab at the top of the unit until the camera arm begins to slide out.
- Pull up to extend the camera arm.
- Continue pulling to the right until the camera arm is fully extended. The arm must be fully extended to use the full-page camera.
- Lay your document flat on the desk to the right of the device beneath the camera.
- Move the document as needed to fit the content in the gray camera frame.
- Optionally, select the best color combination using the blue Color Mode button, and increase or decrease magnification using the yellow Zoom In/Out buttons.
- Optionally, tap the Mode button and go to Advanced mode for further features, such as modifying the display settings or go saving the file.
- RUBY 10 Speech only: Perform text recognition of a document and have it immediately read to you by pressing and holding the red Camera button for 1 second (longer than when you take a snapshot).
If you take a regular snapshot, you can also press the Play button to perform text recognition. You can change the volume and speed of speech using the Sound bar, which is displayed by tapping the Sound Settings button.
Place your page to the right of the device until it is centered in the gray frame on the screen. Press the red Capture button for about 1 second until the screen displays a camera. The text is recognized and read to you. You can save the file or continue adding pages in Advanced mode.
Tip: If your document is not read to you, check your volume level and ensure your reading language is set correctly. If the text seems to be read inaccurately, try repositioning the document or improving the lighting in the environment.
Place your paper beside the device, then write on it while watching yourself on the screen. The same is true with hobbies, such as knitting, painting, or other detailed handiwork.
Before placing your hand under the camera, enable focus lock so the camera focuses on the paper instead of your hand.
Tap the Focus Lock button to toggle between locked and unlocked. See page 30 for more information.
Live camera view is the default. In Live view, you can achieve both a magnified and improved view and prepare the camera to take a clear snapshot. Press the green Live View button to enter Live view.
Press and hold the top yellow Zoom In button or the bottom yellow Zoom Out button on the right side of the RUBY 10 body for continuous zoom magnification. Press and release to incrementally increase or decrease magnification. Both continuous and incremental magnification are available for live, frozen, and saved images.
When the stand is open and focus lock is disabled, the camera automatically stabilizes the image. If no motion is detected, the image is frozen so it is easier to read.
Press the blue Color Mode button on the left side of RUBY 10 to cycle through true color, grayscale, and your choice of color combinations. Color modes can be applied during Live view or after an image has been captured or saved.
In any position, you can tap the screen to focus on one part of the picture. Automatic focus occurs regardless of whether the Focus Lock toggle is on or off. Tapping the screen also displays the on-screen buttons. Tap again to remove the buttons from view.
The Focus Lock toggle is available in Advanced mode when using the overview camera and the full-page camera. Tapping this button locks the focus at its current position, while tapping it again unlocks it.
Locked  Unlocked
Press the red Capture button briefly to take a picture of the current image. Press the green Live View button to close the snapshot and return to live video.
Taking a snapshot can be useful for reading labels or viewing an item more closely. After taking the snapshot, you can optionally press the yellow Zoom In button to increase the magnification of the snapshot, or the Zoom Out button to decrease magnification. Press the blue Color Mode button to display the snapshot in different color combinations. For more information on improving the quality of images, see Color, Contrast, and Clarity.
You also have on-screen buttons for additional functionality. The available buttons depend on whether you are in Default mode or Advanced mode. See Capturing a Page on page 44 for more information.
A light comes on automatically when using any camera. In Advanced mode, however, you can tun off the light when using the overview camera or full‑page camera. Tap the Light button to toggle the light off and on.
Turn light off Turn light on
When lights come on, they brighten gradually, reaching full strength in about 5 seconds to reduce eye strain. For heat protection, the power supplied to the lights is based on the temperature of the device.
You can toggle between using a line, a mask, or neither by pressing the gray Text Mode button. A line or mask help you keep your place on the screen. To move a line, drag it on the touch screen. To change the size of the masked area, drag the boundary.
You have many ways to improve the visual acuity of images and text. Features used to change the way images are displayed and captured include:
- Color modes
- Brightness sensitivity settings
- Color blindness modes (protanopia, deuteranopia, tritanopia)
- Edge enhancements, edge smoothing, or edge-only mode
- Contrast settings
Some features can be toggled by tapping a button on the screen, while others must be enabled using menus. Menus are also used to determine the way images and text are displayed by default.
The Appearance Menu is used to modify the way RUBY 10 displays menus, images, and text. To change the way RUBY 10 appears, tap the screen to display on-screen buttons, then go to Main Menu > Settings Menu > Appearance Menu.

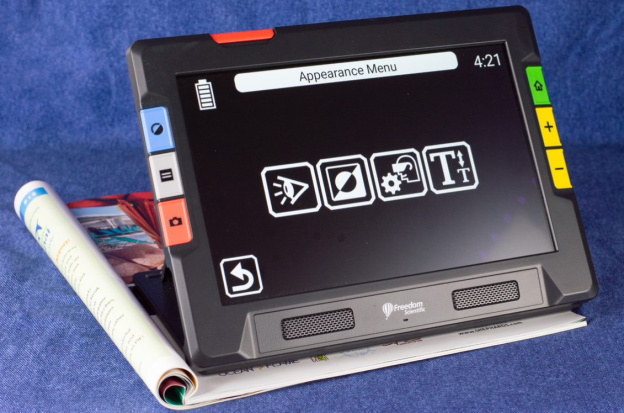
The Appearance menu offers ways to change the way your screen looks and the way the camera projects what is seen. The four icons on this menu display screens that are used to change the appearance of text and images:

| The Viewing Modes screen enables you to change the way text is displayed by default. See Viewing Modes for information on this screen. |

| The Color Combinations screen allows you to determine the color combinations included in the rotation when you press the blue Color Mode button. You can determine one set of colors for menus and text and another set for images. Neither true color nor grayscale is a choice for displaying menus or text files (defined on the Text tab). The default for displaying the menus is light gray on black, but you can change these colors by adding any combination that works best for you. See Color Combinations for more information. |
| The Visual Display Settings screen offers a light sensitivity filter (enabled by default) and color blindness filter (no filter by default). |

| The Font Size screen enables you to change the size of the letters used to display text. The size is set to 28 points by default, but this screen allows you to select the font size that is best for you. |

RUBY 10 arrives with default color modes—full color, enhanced full color, grayscale, black on white, white on black, yellow on blue, and blue on yellow. Full color, enhanced color, and grayscale are always available for images, but you can change the three other defaults from a choice of 72 high contrast color combinations for images or text. You can also add to or subtract from the rotation.
Note If you reset the device, colors modes revert to the original defaults.
You can build two unique sets of color combinations that rotate when pressing the blue Color Mode button. One set is for text, the other for images.
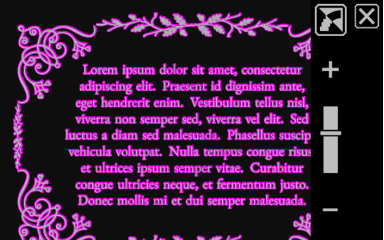
Only high contrast color combinations are used to display documents. The default settings are white on black, black on white, yellow on blue, and blue on yellow. These color combinations are available when displaying:
- The system interface, including menus, screens, buttons, and help text.
- RUBY 10 Speech only: Document views, including Tickertape mode, Teleprompter mode, text files that have been imported, or text files that have been created when you scanned a file where text was recognized.
A separate set of color combinations is used to display images, including Live view, Snapshot view, and Zone view. True color and grayscale are always available for images. High contrast blends are up to you.
- True color matches the real-life image. You can add optional effects to change the brightness and how the colors are presented. In Live view, a long press of the Color Mode button changes the color combination to true color. (Left image below)
- High contrast colors differentiate the background from the foreground and accentuate the features of the image. All two-color combinations are high contrast, as well as Enhanced Color, which is true color with high contrast. (Middle image below)
- In grayscale, the document is shown in black, white, and shades of gray. (Right image below)

The Color Combinations screen displays the color combinations that will be included in the rotation when you press the blue Color Mode button. The available color combinations are up to you, although defaults are provided.
The Color Combinations screen has two tabs. On the Text tab, you set the rotation of color combinations for the RUBY 10 menus and text documents, such as saved files where you have used text recognition, and the Image tab, which includes live view, snapshots, saved captures, and a zone or image view of a document. You can change the selected color combination at any time.
To add a color combination:
- Tap the screen to display the on-screen buttons.
- Go to Main Menu > Settings Menu > Appearance Menu > Color Combinations.
- Tap the upper left Plus button.
- On the Add Color Combinations screen, scroll to select the color combination you wish to add. The selected colors are shown in rectangles, such as black on red.
Note: Optionally, press the left middle button to invert the currently selected color combination, such as changing black on red to red on black.
- To add the color combination, tap the plus sign again. A confirmation message is displayed.
- Continue adding all the color combinations that you want in the rotation.
- Tap the Back button at the bottom left to return to the Color Modes screen. Review the color combinations to ensure you have the ones you want in the rotation.
- To remove a color combination, tap the trash can button, which is the second from the top on the left.
- To add another color combination, return to step 3.
- When you are satisfied with the color combinations in the rotation, tap the Back button or press the green Live View button.
Note: Although you have many color combinations available to you, keep in mind how long it will take to rotate through them. If you want to display in full color, for example, you probably will not want to press the Color Mode button 20 times to get to it.
RUBY 10 offers a light sensitivity filter and three color blindness correction filters to users with varying eye conditions. To display these visual display settings, go to Main Menu > Settings Menu > Appearance > Visual Display Settings.
Two fields on this screen enable you to improve how the image is displayed: the Light Sensitivity Filter and the Color Blindness Filter.
Enabled by default, the Light Sensitivity Filter mutes the lighting of very bright colors to allow for eye conditions where bright light makes it difficult to read. For example, white might be shown as a light gray.

To disable it, slide the toggle to the left.

Rather than changing the overall brightness of the display screen, this setting changes how bright colors are presented in images.
RUBY 10 offers three color blindness correction filters to improve contrast between colors. For example, one filter changes reds to pinks, which is a color better recognized by users affected by protanopia. These filters are applied to colors in the menus and all views, including Live view, Snapshot view, and all Document views.
To enable the Color Blindness Filter, tap the Edit button to the right of the current setting.
On the Color Blindness Filter screen that displays, select the option that appears to be a solid gray rectangle. If none appear to be solid gray, then select No Filter. After selecting one of the four options, tap the Back button.
The setting under Color Blindness Filter reflects the option that you selected. The setting is immediately applied.
To globally change the way images are displayed, go to Main Menu > Visual Properties. Problems that visual properties compensate for might include a crinkled paper, a yellowed page, shadows, ink smears, or book creases. Many adjustments are made automatically, but this screen enables you to set the brightness level and edge definition.
Use the left slider on the screen to control the brightness. Move the slider up (or left) to brighten the screen or down (or right) to darken the screen.
Use the right slider to indicate how edges should be defined in images. To minimize the edge effects, move the slider down. To maximize how defined edges are presented in images, move the slider up. This sets the default used when images are displayed.
Toggle the Edge Effects button and use the corresponding slider to smooth the edges within images, display edges only, or highlight the edges.
This feature is available in Live view, Snapshot view, Image view, and Zone view. Edge effects are global and saved for each camera orientation: magnification, overview, and full-page.
Tap the Edge Effects button to toggle to the desired approach.
| Highlight the edges within the image. Available in high contrast colors, true color, and grayscale. See sample below. |
High contrast with edge highlighting. Tap the toggle button above the slider to show the image with edge smoothing.
| Smooth the edges within an image. The outline is enhanced using the same color as the image. Not available for full color or grayscale. Available in high contrast colors only. |
High contrast colors with edge smoothing. Tap the toggle button to show the image with edges only.

| Show only the edges within an image. Not available for full color or grayscale. Available in high contrast colors only. |
High contrast colors with edges only. Tap the toggle button to show the image with no edge effects.

| Do not apply any edge effects. Available in any color mode. See samples below. |

Full color image with no edge effects. Tap the toggle button to show the image with edge highlighting.
High contrast image with no edge effects. Tap the toggle button to show the image with edge highlighting.
Tap the Reset Settings button to reset the edge effects to the default settings.
If you have RUBY 10 Speech, your device includes text recognition, also called optical character recognition (OCR), and speech. You can capture an image of a page and RUBY 10 will recognize the text and read it to you. In Advanced mode, you have the option of saving the file and capturing multi-page documents, as discussed in the following sections.
You can capture images from any position, whether the stand is open or closed or the camera arm is extended or closed. To capture an image, press the red Capture button. If touch vibration is enabled, you will feel one vibration.
To immediately recognize text and read it, press the red Capture button for about 1 second. A long press results in two vibrations. A camera icon is displayed while the image is captured. To have the text read again, tap the Play button. To close the document and return to Live view, press the green Home button.
For a full page of text, open the stand and fully extend the camera arm. Place the material you want to capture under the camera arm so the page is centered in the gray frame on the screen. Bold, italics, and underline are recognized. For more setup information, see Full-page camera on page 32.
When you capture an image, the following buttons are displayed:
Main Menu | Displays the Main Menu, where you can change other properties to enhance the current snapshot. |
Brightness | In Advanced mode only, displays the Brightness scroll bar. |
Sound Settings | Displays controls for volume and touch vibration. |

Add Image | In Advanced mode only, indicates that you can add an image. |

Add Page | In Advanced mode only, indicates that you can add a page of text to the file. |
Edge Effects | In Advanced mode only, smooths and highlights edges. See Edge Effects on page 45 for options, which vary by color mode. |
Play | Scans the image to recognize text and read it. |
Save | In Advanced mode only, saves the file after it is captured. |
To capture multiple pages:
- Press the red Capture button. To immediately recognize text and read it, press the Capture button for about 1 second (a long press). A camera icon is displayed while the image is captured.
- Tap either the Add Image button or the Add a Page button.
- Continue adding pages until you are done. Tap the Preview button to review the captured pages.
Note: If you are unhappy with the preview, you can delete the page and rescan it.
- If you want to keep the file so you can view it later from File Manager, you must be in Advanced mode. Tap the Save button.
- In the Record Audio Tag? screen, tap Yes to record a name for the file. See Recording Audio Tags on page 55 for more information.
Note: It is recommended that you name each file by giving it an audio tag so that you recognize the contents when you look for it later.
- Optionally, modify the file by tapping the Edit button.
You can move to the previous page of a document by panning to the top of a page, then swiping downward on the touch screen. Move to the next page by panning to the bottom of a page, then swiping upward on the touch screen.
To move around a multipage document, tap the page number to display a scrolling list of page numbers, then either scroll to the page number you want or tap one of the following buttons:

| Start of Document displays the first page of the document. |

| Previous Page displays the previous page in the sequence of scanned pages. |

| Furthest Viewed displays the furthest location that you have previously viewed. If you have a 10‑page document and have viewed the first five pages, for example, then you would jump to page 5. |

| Next Page displays the next page in the sequence of scanned pages. |
Note: You must preview a page to display the page numbers.
You can swap the position of the current page with the previous page using the Swap Pages button.

To save a file, tap the screen to display the buttons, then tap the Save button.
You are asked if you want to add an audio tag, which is a name for the file. We recommend that you do. See Recording Audio Tags for more information.
Each text file is saved using the reading language currently selected. When you save and open the file later, the same language and voice is used to read it. However, you can easily change the language. See Reading Language and Voice for more information.

Audio tags help identify your saved files on RUBY 10. You can apply an audio tag to any file that you save or import. However, a file exported to a USB-C flash drive or copied to a computer will not keep its audio tag, so the audio tag is only useful on RUBY 10.
You can add an audio tag when you save a captured image or text file, or later, when you open a saved file.
To see more information about the file and play its audio tag, tap the Information button. The file is displayed, and its name is at the top of the screen.
You can change the audio tag using the Record button near the top of the screen, just under the file name.
The buttons on the Record Audio Tag? screen are as follows:
| To listen to an audio tag, tap the Play button. |

| To add or change the audio tag, tap the Record button and speak the name of your file. |

| When you are finished speaking the name of the audio tag, tap the same Record button. The recording stops, a slash is displayed over the button, and the name is repeated back automatically. To listen to the recording again, press the Play button (right triangle). |
| To delete the audio tag, tap the Delete button and confirm the deletion by tapping Yes. |

RUBY 10 Speech reads text aloud using the reading language and voice that was set when you scanned the file. It identifies paragraphs and bold, italicized, and underlined text as it reads.
To set the reading language and voice, go to Main Menu > Settings > Reading Settings > Reading Language. The default is English. RUBY 10 offers 20 languages with more being added every day. Languages include Bulgarian, Czech, Danish, Dutch, English (Australian, British, and U.S.), Finnish, French (Parisian and Canadian), German, Hungarian, Italian, Japanese, Norwegian, Polish, Portuguese, Romanian, Russian, Slovak, Spanish (Mexican and Castilian), Swedish, and Turkish.
You can set only one language and one voice at a time for reading. If you were studying French, for example, then you could change the reading language to French. When you were ready to switch back to homework in English, you could reset the language to English.
When you open a text file you captured earlier, you hear the same reading language and voice that was set when you saved it. To delete the language and voice saved with the file and revert to the reading language and voice currently set, go to the Editing File screen and tap the Edit button next to the language.
If you open a text file that you imported, the current reading language and voice is used. You cannot change it, so the Language and Voice button is not displayed in the Editing File screen.
Changing the default reading language and voice does not affect the language and voice saved with each document file.
Tap the Viewing Modes icon to display the Viewing Modes screen, where you can change the way a text file is displayed. The top right icon controls how much text and what format is used to display it—snapshot, teleprompter, or tickertape. The bottom icon sets how text is emphasized—underlined or boxed.
If you open a DOCX or PDF file, or if you open a captured file with recognized text, then the first viewing mode is Zone view. With zones, the text is separated by highlighted and numbered boxes to help you navigate around the document. If you zoom in so the whole page is no longer displayed, you can use the scroll bars to move between parts of the document.
If you tap the Play button, then narration starts at the beginning of the document.
Optionally, you can choose where you want to begin reading by long tapping a zone. In this view, the captured image is in full color. Selecting a color mode changes the zone highlighting and numbering.
In a document, you can press the gray Text Mode button to toggle through viewing modes and determine the best way to read the current text. The first viewing mode is set according to the default selected in the Viewing Modes screen, where you also set the default highlighting and whether lines or masks are used.
In an image, the gray Text Mode button toggles through lines, masks, or neither.
To change the way recognized text is displayed or highlighted by default:
- Tap the screen to display the on-screen buttons.
- Go to Main Menu > Settings > Appearance > Viewing Modes.
- Toggle the top right button to select the default viewing mode. The Viewing Modes screen displays a sample of the current viewing mode while the toggle button displays the next mode in the cycle.

| Snapshot mode shows a full screen of text without high contrast color. |
| Teleprompter mode shows text in paragraph form using high contrast color. |

| Tickertape mode shows one line of text at a time using high contrast color. |
Note: Zones are not available in the Viewing Modes screen and cannot be selected as the default mode.
- Tap the bottom right button to toggle the way text is emphasized as it is read aloud:

| Box highlighting |

| Underline highlighting |
- Each default is set automatically when you make the selection.

In Advanced mode, RUBY 10's file manager enables you to view, store, delete, import, and export files. You can also add or re-record a file's audio tag.
On the Main Menu, tap the File Manager icon to display the saved files on the Images tab and Documents tab.
Icons represent the file type. RUBY 10 supports the following image files: JPEG, BMP, WebP, and PNG. RUBY 10 supports the following document files: DocX, PDF, RTF, and TXT.
A multi-page file is VCB (Vispero Compressed Book), which can be comprised of images and/or text.
Files are ordered by the capture date, or date modified, and the most recent file is at the top.
The system file name, displayed below the file type, cannot be changed.
To open or edit a file, go to Main Menu > File Manager. The Images tab and Documents tab display the saved files.
Go to the Images tab for files with these extensions: BMP, JPEG, PNG, and WebP.
Go to the Documents tab for files with these extensions: DocX, PDF, RTF, and TXT. A multi-page file has a VCB (Vispero Compressed Book) extension. Icons represent the file type.
Buttons on this screen include (top to bottom, right to left):
| Transfer button, which displays the Select Transfer Mode screen, where you can export or import all the image and document files. |
| Back button, which moves you to the previous screen |

| Open button, which opens the selected file (see the Image Files or Document Files sections that follow). |

| Export button, which is used to export the selected file to a USB drive. Only a closed file can be exported. |
| Delete button, which is used to remove the file from the device. Only a closed file can be deleted. |
| Information button, which displays the file and enables you to listen to its audio tag. |
Select the file on the Images tab or Documents tab, then tap the Open button.
See the Image Files or Document Files sections that follow to learn how to edit a file.
Note: You can select and open only one file at a time.
You must close a file before you can open another one. To close a file,you must either save it or discard it. If you have saved an open file, tap the green Live View button to close it.
When you open an image file, tap the screen to display the buttons. Tap a button to make changes to the image.

| Flip the image. |
| Rotate the image clockwise 90 degrees. |
| Rotate image counterclockwise 90 degrees. |
When you open a document that was captured on RUBY 10, the document is read using the same reading language and voice that was set when you saved the file.
If the language is the same as the default reading language but the voice is different, the default voice is used. If the language is available but the voice is not, the voice closest to the missing one by locale and gender is used.
To change the language and voice saved with the file, tap the Edit button next to the language.

If you open a text file that you imported, the current reading language and voice is used. You cannot change it.
If you have named the file by adding an audio tag, then you can listen to it by tapping the Play button at the top of the page. If you wish to re-record the audio tag, tap the Record button. See Recording Audio Tags for more information.
Play Record
From the Files screen, you can export or import files by tapping the Transfer button, which displays the Select Transfer Mode screen.
Tap the Export button to move RUBY 10 files onto a USB-C drive.
Tap the Import button to move files onto RUBY 10 from the main directory of an inserted USB-C drive.
Note: You can only import a folder (directory) of files—not a single file or subfolders (subdirectories).
RUBY 10 exports and imports files automatically so you do not need to be familiar with file directory structure. Leave the default, Previous Directory, selected on the Export To or Import From screen. The files are copied to and from the root directory on the USB-C drive.
Note: You can only export all image and document files via the Export To screen. However, you can export one file at a time from the Files screen by selecting a file name and tapping the Export button.
You have approximately 3 GB of space to save files. However, storage lessens when additional languages are used for OCR and speech. Keep an eye on the amount of storage available to avoid running out of space—if this occurs, you must delete some files to make room before you can save new ones.
To help you manage device storage, review the Device Storage screen. Go to Main Menu > Settings > System Settings > Storage.
If RUBY 10's memory is full, then an error message will display when you attempt to capture an image. You must delete some files before saving new ones. You can either delete one file at a time or all of them at once.
Note: You cannot delete an open file.
If you want to back up the files before you delete them, export them to a USB-C drive. See Exporting or Importing Files on page 67.
To delete a single file, go to the Files screen, select the icon that represents the file, then tap the Delete button.
To delete all files, go to Main Menu > Settings > System Settings > Storage. Tap the Delete All button.
RUBY 10 offers an audio jack, a USB-C connection, Miracast, and Bluetooth to connect with a variety of devices, including headphones, a speaker, an HDMI TV or monitor, a computer, or a cell phone.
RUBY 10 has an audio jack, where you can plug in headphones or a speaker. The round jack is to the right of the orange Power button.
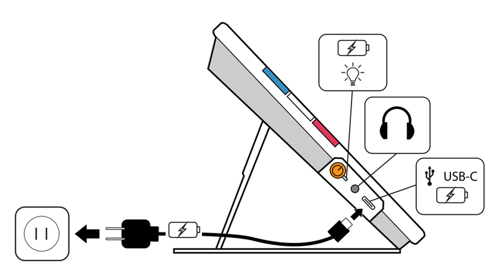
RUBY 10 has a USB C-port, which can be used with the USB-C cable that came in the box to:
- Charge the device.
- Connect the device to a computer to transfer files or perform updates.
You also can connect the device to an HDMI TV to mirror RUBY 10 content using a USB-C to HDMI active cable.
Advanced mode only
You can use Miracast® to stream RUBY 10 audio and visual content to a computer, television, tablets, or phone. The content simultaneously displays on RUBY 10 and the other device. RUBY 10 supports Wi-Fi Direct from RUBY 10 to a device (not vice versa).
Note: Bluetooth is not required to use Miracast.
If you connect to a Miracast-enabled display, RUBY 10 streams its audio and visual content to that display in a mirrored view. You must enable Miracast both on RUBY 10 and the receiving device before you can stream content. To enable Miracast on RUBY 10:
- Go to Main Menu > Miracast. Miracast is automatically enabled when you display this screen.
- RUBY 10 automatically scans for devices and lists them on the Miracast screen. Select the name of the device where you will display the RUBY 10 screen and tap the plus sign.
A message indicates whether RUBY 10 successfully connects with the device. Once the connection is made, RUBY 10 streams its content to that display in a mirrored view.
- When you are done streaming content, either disconnect the device streaming the content, or return to the Miracast screen and disconnect by tapping the X in the upper right corner of the screen.
The word in parentheses by the name of each device denotes its status:
- "Connected" means the device is actively connected with RUBY 10.
- "New" displays beside the name of a device that is not connected.
You can use Bluetooth® to connect RUBY 10 with an audio device, such as headphones or a speaker.

You can only connect with one device at a time. To connect RUBY 10 with an audio device using Bluetooth:
- Tap the Bluetooth button on the Main Menu to display the Bluetooth screen.
- RUBY 10 automatically scans for wireless devices and lists them on this screen. "New" displays beside the name of each device before it is paired. Enable Bluetooth on the device you want to use for audio.
- Wirelessly connect RUBY 10 with the device by selecting its name and tapping the plus sign. The plus sign is hidden while RUBY is connecting.
Note: Keyboards, mice, and microphones are not supported.
- When you are done, tap the Bluetooth button on the Bluetooth screen. The Bluetooth icon is displayed with a slash through it.

When you re-enable Bluetooth, RUBY 10 automatically pairs with all previously paired devices. If you no longer wish to pair with a device, select the device name and tap the Delete button. RUBY 10 disconnects with the device and loses the memory of the connection. The device name is no longer shown.
The word in parentheses by the name of each device denotes its status:
- "Paired" means RUBY 10 previously connected to the device.
- "Connected" means the device is actively connected with RUBY 10.
- "New" means the device has not been paired.
You can update your device by downloading a new release from the Freedom Scientific website and using the Update screen to install it either from a USB-C drive or from a computer using the USB cable. Review the requirements below before following the update steps.
Note: It is recommended that you use a USB-C drive because it requires much less free space on the device.
Before you update your RUBY 10, ensure that:
- You download the release file, which has a VHU extension, from the Freedom Scientific website. A VHU (Vispero Hardware Update) file updates the RUBY 10 software and firmware.
- You have either the USB cable that came with RUBY 10 or a USB‑C flash drive (formatted FAT32). The flash drive is preferred.
Tip: A flash drive can also be used to import/export files from RUBY 10 and download log files for technical support. We recommend purchasing a dual flash drive that offers both USB-A and USB-C. Also, a USB-C adapter can be used with a USB-A flash drive.
- Your device has enough free space to update. To determine the available device storage, tap the screen to display on-screen buttons, then go to Main Menu > Settings > System Settings > Storage. For a more accurate assessment of the space needed, refer to the documentation accompanying the VHU file on the website. It takes less free space if you use the USB-C flash drive rather than the USB‑C cable.
- Your device has 60 percent battery power according to the battery icon in the top left corner of the screen. The percentage of available battery is displayed either next to or under the icon.
60%
Note: The device is fully charged when the LED light by the orange Power button is green.
This method is preferred because it requires much less free space on the device. To update the device using a USB-C flash drive:
- Go to the Freedom Scientific website and download the latest RUBY 10 release file, which has a VHU extension.
- Copy the VHU file onto a USB-C flash drive.
- Insert the USB-C drive with the VHU release file into the RUBY 10 USB port.
Caution: Do not remove the drive before you receive the confirmation message and the system fully restarts.
- On RUBY 10, go to Main Menu > Settings Menu > System Settings > Update Device.
- Select the file and tap the Update button.
Tip: If the file does not display, try flipping over the USB-C flash drive and reinserting it into the port.
- After the update, a confirmation message displays. Tap OK and the system automatically restarts.
To update the device using a USB cable:
- Go to the Freedom Scientific website and download the latest RUBY 10 release file, which has a VHU extension.
- Insert the USB-A side of the cable into the computer where you downloaded the VHU file.
- Insert the USB-C side of the cable into the RUBY 10. File Manager automatically detects the RUBY 10 file structure.
- In Windows File Manager, copy the VHU file from the computer into the DCIM/Updates folder on RUBY 10. The Update Device screen automatically opens on RUBY 10 when you begin copying, but do not proceed until the file has copied 100%. Check the file transfer progress bar to determine the status of the copy.
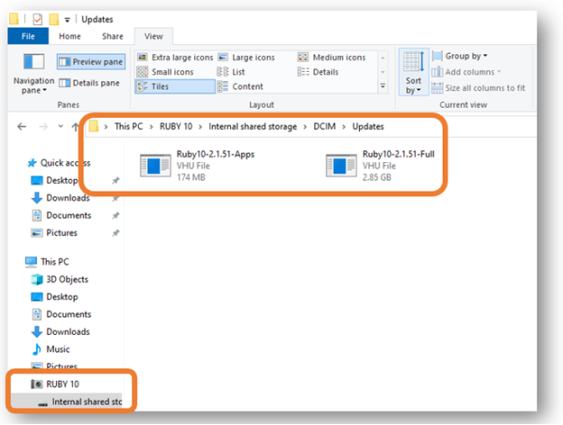
- Select the file and tap the Update button.
- After a successful update, a confirmation message displays. Tap OK and the system automatically restarts. The VHU file used to update the device is automatically deleted from the RUBY 10.
Note: Rarely, an Invalid Configuration screen with an Update button displays. If this happens, copy the VHU file onto a USB-C flash drive, insert it into the RUBY 10 USB port, and tap the Update button on the Invalid Configuration screen.
This chapter outlines the contents of the menus and the screens used to modify the behavior of RUBY 10. To display the Main Menu, tap the Mode button to enter Advanced mode. In Advanced mode, tap the Main Menu button.
Tapping an icon on the Main Menu displays another menu or a screen for performing tasks. You can tap the Back button to move through previous menus, or you can press the green Live View button to get out of the menus entirely.
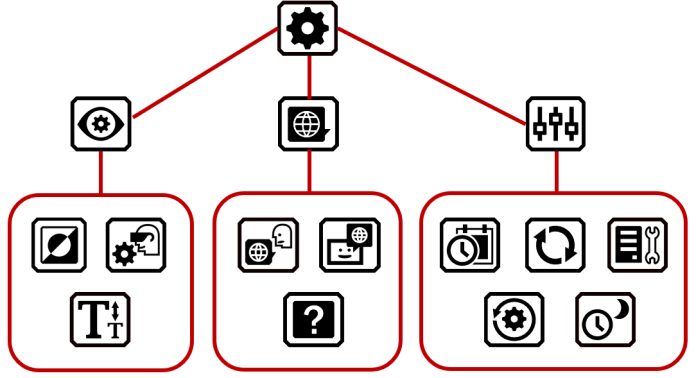
The Main Menu includes eight icons.
File Manager |
Settings Menu |
System Mode |
Information |
Miracast Wireless |
Bluetooth Wireless |
Visual Properties |
Sound Settings |
Displays the Files screen, which has an Images tab and a Documents tab. You can import and export files from this screen, as well as open files and assign audio tags. See page 55 for more information on managing files.
Opens the Settings Menu, which has three icons used to display the Appearance Menu, the Language Menu, and System Settings. These menus enable you to change the default appearance of images and documents, define reading and menu language and voice, and update system settings.

Takes you to screens where you set the color combinations, visual displays settings, and default font size.
Has two tabs where you select the color combinations included in the rotation when you press the blue Color Mode button. One tab controls text colors, while the other controls image colors. See page 34 for details.
Enables you to set filters for light sensitivity and color blindness.

Allows you to set the default size of text. The Menu tab default is used in the menus, screens, and help text of the RUBY 10 user interface. The Documents tab is used for recognized text. You can select 24 point through 72 point font size.
Displays screens for setting the menu language (and the reading language on RUBY 10 Speech). Also takes you to a screen that defines whether the help text is available and narrated.
Displays the Select Menu Language screen. Using the Language tab, select the language used to display the menus, screens, messages, and help text. Optionally, tap the Voice tab to select the voice used to narrate the user interface while you move around the system.
RUBY 10 Speech only: Displays the Reading Language screen. On the Language tab, select the language used to perform text recognition when you scan a document. Tap the Voice tab to select the voice used to narrate the recognized text in document files.
Displays the Help Text screen, which enables you to view (and/or listen to on RUBY 10 Speech) a short description of the current place you are pressing or tapping. Press and hold for 3 seconds any hardware button, software button, or icon to display the help text.
Displays the System Settings menu, which takes you to screens for determining characteristics of the device: time and date, touch vibration, updating the device, and device storage.
Displays the Time & Date screen, where you tap each Pencil icon to the date or time field. Swipe up or down in each column and tap to set the date and time. You can also choose to use a 24-hour clock by swiping the scroll bar by 24 hours to the right. The time is displayed in the upper-right corner of the screen, and files are time stamped with the time and date when you save them.
Displays the Update Device screen, where you can install a new release of software and firmware. See Updating RUBY 10.
Displays the Device Storage screen, which shows the available gigabytes of storage remaining on RUBY 10. See Storing Files on page 60.
Displays the Reset Settings screen. Tapping Yes on this screen returns the device settings to the original factory default values. You will have to set the menu language and voice, font size, and time and date just as you did the first time you used RUBY 10. See page 2 for instructions
Displays the Standby Time screen, which is used to set the number of minutes the device is unused before automatically entering standby mode. Values are None to 30 minutes. Select the value and tap Previous to immediately enable the new value.
Either enters or exits Advanced mode. You must be in Advanced mode to save files, create multi-page documents, or connect via Miracast. See Default Mode and Advanced Mode on page 17 for more information.
Displays the Information screen, which provides technical facts about the device and support contact information. The Delete button on this screen enables you to clear support data. The Export button is used to export support data to a USB-C drive or to another computer using the USB-C cable.
In Advanced mode only, displays the Miracast screen, where you can connect RUBY 10 to another display device, such as a television, over a wireless connection.
Displays the Bluetooth screen, where you can connect RUBY 10 to another device via a Bluetooth wireless connection.

Displays the Visual Properties screen, where you can globally adjust the contrast to improve how images display. You can also adjust how much edges are smoothed and/or highlighted. See Visual Properties for more information.
Controls the system sound and touch vibration.
Globally control the volume by sliding the top control left for softer or right for louder.
Softer  Louder
Tap the far-left icon to mute all sound.

RUBY 10 Speech only: Move the bottom slider left to slow the rate of speech or right to increase it.

For immediate feedback confirming your actions, RUBY 10 vibrates briefly when you press a physical button or tap a software control (e.g., a checkbox, radio button, toggle switch, icon, or on-screen button).
Tap the Touch Vibration toggle at the bottom of the screen to enable or disable tactile response. A tap or short press results in one vibration. A long press, about 1 second, results in two vibrations. When you display the online help by pressing and holding a software control for 3 seconds, or power down holding down the Power button for 7 seconds, three vibrations occur.
 Notes
Notes
RUBY® 10 and RUBY® 10 Speech
RUBY 10 Advanced Features and Functions 1